How to make your own gun in Relic Hunters Zero
Hello boys and girls. As you probably know since you’re reading this, Relic Hunters Zero is an Open Source game – which means you can start making your very own stuff with it right now! To help you get started, I have created this beginner-focused tutorial in which I’ll walk you through all the required steps in order to make your very own Relic Hunters Gun! Let’s bring some new pew-pew to the face of all that is evil, shall we?
*UPDATE* Video Tutorial Now Available!
RHZ Open Source Tutorial #2: Basic Gun – YouTube

So the first thing you need is to make sure you have the latest project code running on your Windows machine. In this article I walk you through downloading the code, Game Maker Studio and setting everything up.
Have everything up and running? Great. Let’s make a gun!
Step 1: Creating the gun sprite
Let’s start with something fun: getting a unique look for your weapon. You don’t need to be a great artist in order to have fun making guns in Relic Hunters – we designed their visuals to be very simple and easy to create. If even I can draw a passable Relic Hunters gun, I’m sure you can do even better!
I recommend using one pre-existing gun from the game as a basis. Just pick something that looks roughly like what you want to make, and open it in your favorite software-editing program. Unfortunately MS-Paint won’t do, since we need our final result to have transparency. I will use Photoshop during this example, but you can use Gimp, or Spriter, or even Game Maker’s own image editor – anything that you feel comfortable with and have access to.
So let’s say I want to make a sawed-off shotgun and go Wild West on the evil Ducans in the game. I’ll just take the shotgun sprite here from the “RelicHuntersZero.gmx\sprites\images\” folder and open it on my image editing software. Notice there are three images – take the first one.

Now I’ll make sure to save it with a different name to make sure I don’t accidentally overwrite my original shotgun! Just save it as a PNG file named “sawedOffShotgun0.png”. Now we’re ready to make our own art!
We want something shorter, so I will keep the rear and end part of the gun and delete the middle section, then I join the two sections, like so:

Already looking like a different gun, right? But we can get more creative than that. Let’s choose two or three colors for our gun: I picked a brown and two shades of gray.
Now, with the PENCIL tool (don’t use brushes or anything with soft edges like that – we need something “hard” to do pixel art), set it for 2 pixels wide and get ready to work!

I tweak the shape of the shotgun here to make it feel bulkier and to help communicate better to players how it might behave when you actually use it – a very short-range but powerful little beast. Again, I’m not an artist, and you also don’t need to be – just express yourself and try different things until you get it right. If you’re feeling insecure, you can use an existing image as a reference – “real” artists do it all the time! On the right there is the image I used to guide me while tweaking my sawed-off shotgun sprite.
Ok, so now we are almost done. Save the sprite again to keep what we’ve made. Now we will add a white “stroke” to the image – this is a visual feedback for the players to know that they can interact with this gun when it is on the ground.
Just add a 2-pixel-wide outline around the gun. Use a solid white color (255,255,255) and save it as a different file – in my case, I named it “sawedOffShotgun1.png”. It looks like this:

For the third and final image, we’ll need a completely white version of the sprite. You can achieve this by bumping the Lightness of the image in your image editing software (in Photoshop it’s in Image->Adjustments->Hue/Saturation), or even by paiting it by hand or any other way you want to do it. Save it as the third and final file – in my case, “sawedOffShotgun2.png”. It looks like this:

Step 2: Add the Gun Sprite to the Project
Now that we have our 3 images, we are ready to start coding them into the game as an actual new gun!
Open the project and head to the “Sprites” folder. Under the “Guns” folder we will create a brand new sprite by right clicking on it and selecting “Insert Sprite”.
Now we click the “Load Sprite” button, and navigate to where we saved our beautiful art. Select all 3 images (the regular, the outlined, and the completely white) and click “Open”.

This will create a sprite with three “sub-images”: a regular one, an outlined one, and a completely white one. Subimages are normally used for animation, but in this case we’re using to save space – no need to create three separate sprites for the very same gun, right?
So now we name our gun. I tend to start my Sprite names with the “spr_” prefix. This is not mandatory but it’s a good thing to do to keep the project organized and keep resources easy to find. So I will name my creation as “spr_sawedoff”.
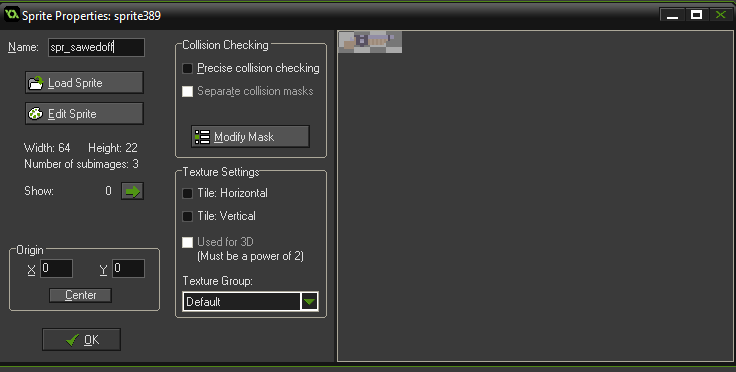
We’re almost done! Now we need to set the “Origin” position of this sprite. This position is the “center” of the image, so to speak, and determines many things such as rotation axis, coordinates in the game world and etc.
In Relic Huntes Zero, all gun Origin positions are set on the handle – wherever your character’s hands should be holding the gun. So I place mine right there at the handle, at position X:18 and Y:15. You can do that by manually typing the values into the Origin boxes on the bottom left, or you can click on the image directly. The Origin is represented by a cross on the image, like so:

And now our sprite is done! Nice job! Click ok and let’s get to coding!
Step 3: Defining the Gun Object
So now we need to define the gun’s Object. Objects in Game Maker, as the manual says, are a special resource that we use to control aspects of our game and to do specific things. Most of the time they have a sprite associated with them so that you can see them in the game. They can be given behaviors and they can react to certain events as well as to each other, and most of the things you see in a game are based on objects and their interactions.
So, naturally, if we want or gun to do anything in the game it must be an Object!
Start out by navigating to the Objects folder, and then finding the “Player/Guns” subfolder. Here we will add a brand new object by right clicking and selecting “Insert Object”

This time we’ll start by naming it. In Relic Hunters I usually name my objects with the “obj_” prefix, so this one is going to be called “obj_sawedoff”.

Let’s add the sprite we just created to it. Do this by clicking the “<no sprite>” field right under the name and selecting our sprite. In my case, it’s “spr_sawedoff”, remember?

Now we need to tell the game that this is a gun, and how it behaves. Luckily for you, I have already created a “Class” of object called “class_gun”, which tells the game everything that a gun is and does. All we need to do now is assign our new gun to this Class.
Just click the field next to the “Parent” button and select “class_gun”

But our gun is not just like any other gun, right? It is a special, unique and cool gun, so we have to define what makes it different. To do that in Game Maker we use Events and Actions.
An Event is something that happens in the game. Something collides with something else? That’s an Event. The game starts? That’s an Event. Every second of the game? That can be an Event too.
An Action is something that we tell the computer to do when the Event happens. So we can say stuff like “Hey computer, when you Create this gun in the game world, make it a sawed-off shotgun”.
So let’s do just that. We will start by defining a Create event: just right-click the empty space called “Events:” and select “Add Event”.

Choose the “Create” event, the one with the little lamp icon.

Now we’ll tell the computer what to do when the object is Created, right? We will do this by adding some code. Click the “Control” label on the right, and then drag and drop the little text icon to the empty space, like this:

A window should open instantly! Don’t be alarmed as this is perfectly normal. This is Code that we will use to tell the computer what happens when our gun object is created.
What we want is to tell the computer that this is a perfectly normal gun, and then we will define what makes it different.
So let’s start with this code:

The green line up there is a “comment”. The computer ignores this, so it’s a way for us to write notes for ourselves and organize our code. Every time you put “//” in front of something, it’s a comment. In Game Maker, we can use “///” as a special type of comment: this will be the title of our code. It’s not mandatory to do this, but it’s good to keep things organized, don’t you think?
= )
Then there’s the orange line. It’s executing an action called “event_inherited()”. This means that it will do everything that the Parent object does on its Create event. This means that this is just like “class_gun”.
“Ok, but we don’t want it to be JUST like a regular gun, right?”. No we don’t, smarty pants! So now we can write anything else we want to be different from the class_gun. This sounds intimidating, so I recommend looking at a pre-existing gun with similar characteristics to yours and starting from there. We will just copy the code from the shotgun that already exists, and paste them on our new code.
We can open a pre-existing gun simply by double clicking them on the project. I open “obj_shotgun” and it’s very familiar: it has the Create event, and a Code action associated to it! I double click the Code to check it out:

Looks like a bunch of cool stuff to play with! Let’s copy-and-paste all this to our own code on the left so that it looks like this:

And now we can start to do some editing. I want my sawed-off shotgun to do more damage, have more power, and reload faster than the shotgun. On the other hand, it will have less range, and only 2 bullets. I also lower the “fire rate” time to allow player to quickly fire the two bullets. Now my code looks like this:

Notice how I changed the “name”, “projectile_damage”, “projectile_range”, “projectile_power”, ”ammo”, “reload_time” and “fire_rate” numbers. This will create a gun that feels completely different from the regular shotgun!
Also, make sure you change the “object” to the actual name of your gun object (in my case it’s “obj_sawedoff”.
And we’re done! Click the green “V” icon on the top of the Code to save and close it, then click “OK” to close the Object window, we don’t need to change anything here anymore.
Step 4: Adding a Pickup
So now our gun exists! You can’t wait to shoot it, can you? Me neither, so let’s add a “Pickup” object in the world so that one of the Hunters can pick up the new gun and use it.
This is quite similar to creating the Gun object, but even faster!
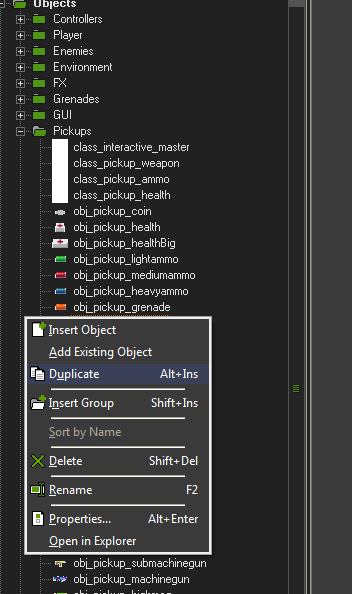
Navigate to the “Pickups” folder. This time we will take a shortcut: right-click the “obj_pickup_shotgun” object and select “Duplicate”. This will create a perfect copy of it for us to work with.
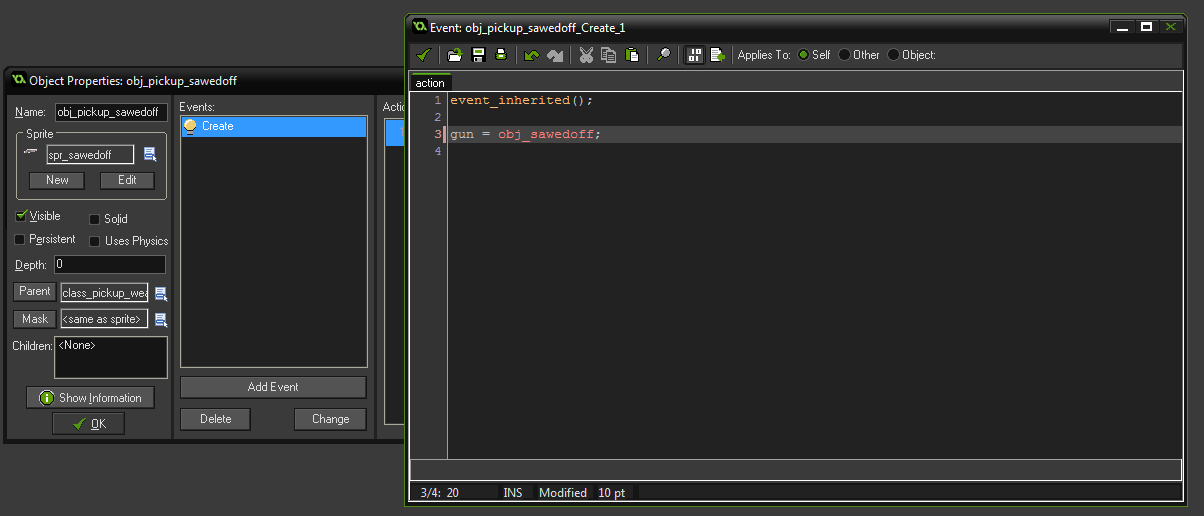
Let’s name it properly. In my case I use “obj_pickup_sawedoff”. We also need to use the very same sprite we already created. In my case it’s “spr_sawedoff”. Your duplicate should then look something like this:

Ok, but this is still behaving like the regular shotgun pickup, right? Let’s change that. Double-click the Code action like we did before, and change “gun” to the correct object, like this:
And we’re done! Again, click the green “v” to save and close, and click “OK” to close the object window.
Step 5: Placing the Pickup on the first room
Now we just need to put this Pickup object on the very first room of the game so that we can pick up our gun and shoot with it!
Open the starting room by navigating to the “Rooms” folder and double-clicking the “room_start” file.

Use your mouse wheel to zoom out. Can you recognize where you are? This is the very beginning of the game! Click on the objects tab on the left:

Now click the empty space and select the Pickup Object we just created:

Almost done! Just left-click next to Jimmy there in the room’s entrance and we’re done.

Click the green “v” on the top left to save and close. Are you ready? Take a deep breath and run the game! It will take a bit long as it loads the new images and objects into the project, but it should be ok.
Step 6: Testing and tweaking
Fire your gun around. Does it feel the way you wanted? You can hop into any teleporter and take it to the levels. Take notes, if you feel like it.
When you’re done, open the gun object again (in my case, “obj_sawedoff”) and edit the Code action on the Create event to make any adjustments. I found that my sawed-off shotgun was pushing enemies a bit too far away, so I lowered the “projectile_power”. I also wasn’t happy with the range, so I decreased “projectile_range” as well.
Save the file by clicking the green “v” icon, and run the game again. Is it how you wanted now? Keep repeating this cycle until you’re happy with your gun.
Step 7: A Few Tips
Here are a few quick tips to make your gun more interesting:
Give your gun a personality. What makes it feel unique? When people describe your gun, what will be the first thing you want them to say? If your gun plays just like other existing gun, what’s the point?
Give it a strong point and a weakness. My sawed-off shotgun is really good to instantly destroy an enemy at close range, but it is only useful at very close range. Making an all-powerful gun can be fun, but only for a little while – after that, it will make the game less exciting to play.
Explore what the variables do. Have you tried tweaking “decay”? It controls how the bullets speed up or down after they are fired. Another cool variable is “burst”, which makes the gun fire repeatedly with just a single press of the trigger! Open the other gun objects, check out what they do, and don’t be afraid to experiment and try crazy things – you might be surprised with what you end up creating!
We’re All Done!
Well, congratulations – you are now a game developer! Your new gun is in the game, and you can make many more. You can change anything you want, or even create new things from scratch. The process is the same – you just need patience to learn how.
~Mark